


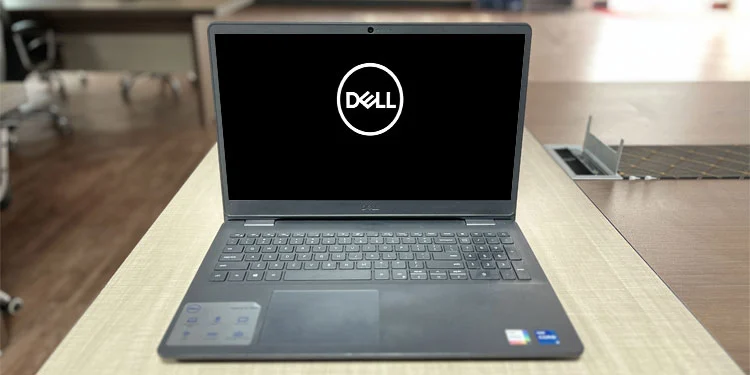
After you power up your Dell laptop, it runs the Power-On Self Test (POST) through its BIOS to diagnose your hardware devices. Then, the BIOS loads the boot code from your boot device to start the operating system.
During these two processes, the Dell logo shows up on the screen. So, if something goes wrong during that time, you will get stuck with the same screen. This situation indicates problems with your hard drive, BIOS or Operating System (OS). But other hardware components like the built-in keyboard or RAM may also be responsible in some cases.
Run ePSA Pre-boot System Assessment
Dell comes with a hardware diagnostic functionality on its BIOS called the ePSA Pre-boot System Assessment. So, first, you should use it to test your hardware components for any severe issues.
- Press the F12 key when on the logo screen to get some boot options. You may need to force restart your laptop once (press and hold the power button for 3 seconds) and then press F12 repeatedly as soon as you get to the logo screen.
- Use the arrow key to highlight Diagnostics and press Enter to run ePSA Pre-boot System Assessment.
- Follow the on-screen instruction and wait for the test to finish. It will then display the details of any hardware issues on your system.
After determining the faulty hardware, you can replace it with a new one to resolve your issue. You can use the steps in the next method to learn the necessary process. But you can also get help from a hardware specialist to repair or replace the device.
Also, if you replace your storage disk, you need to install Windows OS on the new disk before you can use it.
Manually Diagnose RAM, Storage Drive, and Keyboard
In case you can’t press any key while on the Dell screen, it is probable that your keyboard is damaged. But it can also occur when your RAM or Storage drive is not working properly. In such situations, you need to manually diagnose these devices.
- Force shut down the laptop.
- Remove the detachable battery. You need to slide its lock/s to remove it.
- If your laptop has a single panel on its back, remove all the screws.
- If it has separate small panels, you only need to unscrew them. Also, make sure to take out any screws connecting the keyboard. Check the user manual or official sources if you don’t know which screws to remove.
- Pry out the panel from all sides using prying equipment. Then, take out the panel.
- If it doesn’t come out, don’t be forceful. There may be additional screws inside the keyboard panel (Only if it has a detachable panel and you can see seams between the keyboard and the rest of the case). This is the case for the laptop I’m using for this article. However, on other laptops, you should be able to remove the back panel without any issues.
- Use a prying tool to remove the panel from its locks (usually on the top side only). You need to insert the tool (spudger) at the locks and carefully unlock them.
- Take out the keyboard panel carefully. Don’t use too much force as the keyboard is connected using a thin ribbon cable.
- Unlock the clip on the port connecting the cable using a spudger. You need to pull it up.
- Then, take out the connector from the port by pulling the cap on the ribbon cable.
- Put the keyboard aside.
- Remove any other CD/DVD or secondary HDD cables in the same way. You can remove all of them if you don’t know which ones they are.
- Then, remove the laptop’s back panel. If you have a CD/DVD on the laptop, you may need to slide out the panel from one corner as a hinge part can obstruct the caddy.
- Use a prying tool to remove the panel from its locks (usually on the top side only). You need to insert the tool (spudger) at the locks and carefully unlock them.
- After removing the back panel, detach all internal battery cables.
- Make sure not to touch the internal circuit with your hands unless you are using antistatic equipment. Doing so will damage the hardware components due to electrostatic discharge (ESD) If you need to touch any modules, hold them from their sides or metal parts to avoid touching the circuit.
- Now, you need to remove the Storage Drive and the RAM.
- Unscrew your storage drive from the motherboard.
- If it doesn’t have any cables, slide out the drive gently and remove it. Otherwise, you need to remove the cable connector in a similar way to the keyboard cable.
- Place it on an antistatic bag or its original packaging.
- Then, locate your RAM.
- Pull apart the locks holding it in place to pop it out.
- Then, detach it from its slots and place it on another antistatic bag or cardboard packaging.
- Then, let’s move to the keyboard if you haven’t done so already.
- If your laptop has a removable keyboard panel, remove them using the earlier steps. Otherwise, you need to disconnect its connector from the other side.
- Unscrew the internal batteries and take them out.
- Disconnect the keyboard connector (look for the widest ribbon cable).
- Reconnect the internal batteries (not any external) and the AC power supply. Don’t put back the laptop’s panel yet.
- Power up the computer and see if it passes the Dell logo screen (you still can’t boot into any OS). If so, one of the components you removed was causing the issue.
- Force shut down the laptop again.
- Reinsert the RAM. You need to insert it into its slot and press down gently to pop it back in place.
- Power up the computer and check if you get stuck on the logo screen.
- If not, force shutdown again and, this time, reinsert the storage device. If it uses a ribbon cable connection, make sure to insert the cable by holding the cap and then lock it by lowering the clip.
- Check again by turning on your laptop. If it passes the Dell logo screen, your keyboard may have short-circuited somewhere.
This way, you can determine if your RAM, Storage drive, or Keyboard was causing the issue. Now, you simply need to replace the damaged device with a new one. If you replace your storage disk, you need to install Windows OS on the new disk before being able to use it.
Check BIOS Settings
You will also experience this issue if you haven’t configured some BIOS settings on your system, such as:
- If your default storage drive is not at the top of the boot priority list, the BIOS may be searching for other boot devices to load the OS.
- Your Operating System is not compatible with the Boot mode (UEFI or CSM/Legacy). You need to set the correct mode depending on whether you installed the OS with GPT or MBR partition accordingly.
- Your BIOS date and time settings are incorrect and the laptop is trying to boot from a network device.
So, you need to get to the BIOS and change all such configurations as necessary.
Note: Depending on your model and BIOS version, your laptop may have a different BIOS interface. The general options should be the same, so you can look around for them. Or you can check official sources.
- Power up or force restart the PC and then press the F2 button to boot to BIOS. You may need to press it repeatedly to get the timing right.
- Go to Settings > General > Date/Time.
- If the date or time is incorrect, change it. Save and exit the BIOS and check if it works.
- If you still get stuck on the logo screen, try changing the boot order,
- Go to BIOS again and head over to Boot sequence (inside Settings > General).
- If you have Legacy Boot mode, make sure your Internal Storage is at top of the list.
- Save and exit the BIOS and check again.
- If the error continues, you need to check the BIOS mode.
- Boot to BIOS again and go to Boot Sequence and check your current Boot mode.
- If it is UEFI,
- Go to Secure Boot > Secure Boot Enable and check Disabled.
- Then, go to Advanced Boot Option.
- Check Enable Legacy Option ROMs.
- If it is Legacy/CSM, check UEFI.
- Save and exit again and see if you can successfully boot to your OS this time.
If you are in UEFI mode, rather than enabling legacy options, you may need to switch to Legacy entirely depending on your OS.
Rollback or Update Driver
A previous Intel Rapid Storage Technology driver had a bug that caused conflicts between the driver and the current BIOS at that time if Fast Startup was enabled on the system. In such cases, users needed to force restart their computer one or more times to be able to pass the Dell logo screen. While the newer version of the driver no longer contains such bugs, it may happen in the future.
If you experience similar issues, check if you recently updated any drivers, especially storage drivers. In such cases, you need to roll them back to their previous versions.
- Keep on force shutting down the laptop and then boot it back again until you can get past the logo screen.
- After logging in to your account, press Win + R to open Run.
- Type
devmgmt.mscand press Enter to open the Device Manager. - Expand IDE ATA/ATAPI controllers and Storage controllers.
- Double-click on all the devices within these categories and go to the Driver page.
- If the Driver Date is very recent and corresponds with the time you started getting this issue, click on Roll Back Driver.
- Specify any reason and click Yes.
- If the issue resolves, you can report it to Dell and wait for proper updates. Then, install them as soon as they are available.
You may able be able to resolve the issue by disabling Fast Startup, but troubleshooting the driver is a better solution.
Reinstall Windows
If you ruled out hardware issues and the previous solutions were not useful, your operating system is likely corrupt. The only way to resolve this issue is by reinstalling Windows.
- First, you need to create an installation media if you don’t have it already. You can use your friend’s or a library computer to do so.
- Go to Microsoft’s Windows Software Download platform.
- Select your Windows edition and click on Download Now under Create installation media.
- Run the Media Creation tool and click Accept to agree with the license terms.
- Uncheck Use the recommended options for this PC and set the Language and Edition for your laptop (since you are creating the installation drive on another system). Click Next.
- Insert a USB drive with at least 8 GB capacity into the computer.
- Check USB flash drive and click Next.
- Choose the flash drive and hit Next > Finish.
- Then, insert the USB drive into your Dell laptop and boot using this device. If you are on legacy mode, you may need to go to the Boot priority options and set the USB device at the top of the list.
- Pick your language preferences and click Next.
- Select Install now.
- Type the product key for your Windows edition and select Next. If you don’t have the key, choose I don’t have a product key. Then, select your Windows edition and click Next.
- Agree with the license agreements and click Custom: Install Windows only (advanced).
- Select the partition with the OS (Type shows Primary) and click Next.
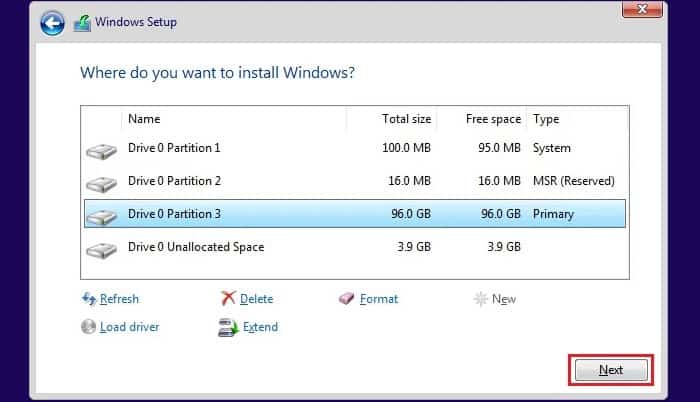
- Follow the onscreen instructions to complete the installation and go through the initial account setup process. Then, install all device drivers and Update Windows as necessary.