


You can usually connect to Wi-Fi on your Dell laptop by selecting the Service Set Identifier (SSID) or network name and entering the password. However, there are a few things that can go wrong depending on your router or system configuration.
Here, we will provide a step-by-step guide on connecting your laptop to Wi-Fi. In the end, we will also mention how you can resolve any potential issues that you can encounter during the process.
Before you begin, you need to power on the router, modem, or network extender and make sure the network cables go to their proper ports. Also, make sure you know the SSID (Network name) and the password of the Wi-Fi network.
Step 1: Put Laptop in Router’s Range
Each router or access point has a range where it can properly broadcast the Wi-Fi signal. If your laptop is not in this range, it can’t connect to the network. Apart from that, physical obstructions like walls and doors can also weaken the signals. So, you need to make sure that the Dell laptop is close enough to the router or access point.
Also, equipment such as refrigerators, microwave ovens, etc., can also interfere with the Wi-Fi signals due to electromagnetic interference. So, make sure such devices are not interfering with the Wi-Fi signals.
Step 2: Enable Wi-Fi on Dell
Some laptops include physical Wi-Fi switches. You should be able to find them on the sides of the device. If your laptop has such a switch, make sure that it is On.
After that, you need to see if Wi-Fi is enabled in the Dell settings as well.
- Click on the Network icon on the Taskbar and click on Wi-Fi to enable it. If you can’t find the icon, click on the up-arrow icon first.
- If you can’t see the Wi-Fi option or icon,
- Open Run by pressing Win + R.
- Type
ncpa.cpl. Press Enter to open Network Connections. - If your Wi-Fi device is Disabled, right-click on it and select Enable.
- Then, try enabling Wi-Fi again.
Depending on your model, the laptop may also have a shortcut to toggle Wi-Fi on one of your function keys.
Note: If you enable Airplane mode after enabling Wi-Fi, the computer automatically disables Wi-Fi. However, you can still manually turn Wi-Fi on after going to Airplane mode.
Step 3: Connect to the Wi-Fi SSID
Now, you can finally connect your laptop to Wi-Fi.
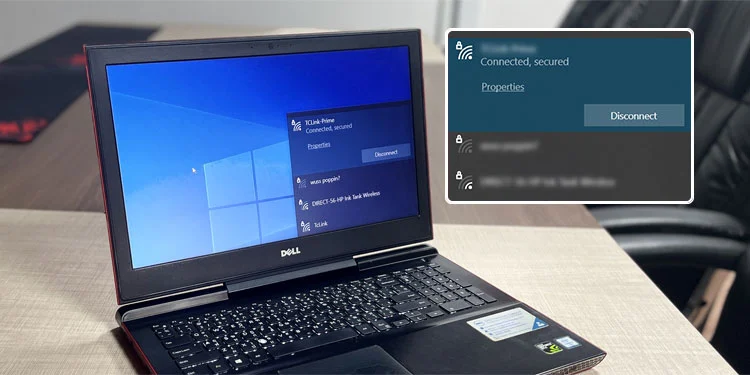
- Click on the Network icon.
- On Windows 10, you can directly select the Wi-Fi network you want and click Connect.
- On Windows 11, click on the down arrow next to the Wi-Fi icon and select the network. Then, click Connect.
- You can also check Connect automatically to avoid having to connect to the same network manually time and again.
- Enter the security password/key or PIN if prompted and select Next.
- Follow the on-screen instructions and set further configuration according to your preference
If you can’t find the SSID on the list, your Router is not configured to broadcast its SSID. In such cases, you need to log in to the router portal using an Ethernet connection. Then, search for the necessary setting (usually Wireless SSID broadcast), and set it to Enabled. If you can’t find the option, check official sources for the exact location.
Problems Connecting to Wi-Fi?
If your laptop doesn’t connect to the Wi-Fi or if the Wi-Fi doesn’t work even after connecting it, you can do a few things to troubleshoot this issue.
Restart Router
Check if all the necessary LEDs, especially the Internet or Online LED, light up after some time. You can check with the ISP or instruction manuals to know which ones you need to look out for.
If some LEDs on your router, like the Internet LED, do not blink, it indicates that the router is not connecting to the internet. In such cases, power off the router for 20 seconds and then restart it again. After that, try pressing the reset button for 10 seconds using a pin or straightened paper clip.
It’s also best to restart the router, even if all LEDs glow, whenever you can’t connect to the internet.
Enable Wi-Fi on Router
It is possible to disable Wi-Fi on some routers from their portal. In such cases, the WLAN or Wireless LED turns off. Here, you need to connect the router using an Ethernet cable, access its portal/settings and enable Wi-Fi.
Reset IP Configuration or Set Static IP
You can’t connect to the network through any network if your device is not getting a valid IP address from the Dynamic Host Configuration Protocol (DHCP) of the router or ISP. You can resolve this issue by resetting your TCP/IP configuration.
- Open Run by pressing Win + R.
- Type
cmdand press Ctrl + Shift + Enter to open the Elevated Command Prompt. - Enter the following commands:
ipconfig /release
ipconfig /renewnetsh int ip resetnetsh winsock reset
Sometimes, the DHCP can become corrupt and may not provide a valid IP address to your device. In this case, resetting the TCP/IP does not work. Here, you need to manually set a static IP.
- First, check the Default Gateway and IP address on your computer.
- Open Run.
- Type
cmd. Press Enter to open the Command Prompt. - Enter the command
ipconfig. - Check IPv4 Address and Default Gateway of your network (Wi-Fi).
- Then, open Run again.
- Type
ncpa.cpl. Press Enter to open Network Connections. - Right-click on your Wi-Fi network device and select Properties.
- Double-click on Internet Protocol Version 4 (TCP/IPv4).
- Check Use the following IP address.
- Enter the Default Gateway address from earlier on the Default gateway section.
- Now you need to enter a valid address on the IP address. The first three numbers separated by the dot should be the same as the Default gateway. And the fourth number must usually be between 0-255. Also, other devices connected to the same Wi-Fi network may be using specific addresses.
- So, try entering a slightly higher number than the Default gateway. For instance, if the gateway is
192.168.10.1, try entering192.168.10.10. - Click OK.
- If the Wi-Fi doesn’t work, keep changing the IP address value within the range (0-255) and check if the problem is solved.
Reinstall Wi-Fi Driver
All devices need corresponding drivers to work. So, if you can’t connect to the Wi-Fi network or the Wi-Fi is not working, you should try reinstalling its driver.
- Open Run.
- Type
devmgmt.msc. Press Enter to open the Device Manager. - Expand Network adapters and look for the Wireless device. The device usually has Wireless, Wi-Fi (not Wi-Fi Direct), or WLAN on its name.
- If it shows an error (yellow exclamation mark), right-click on it and select Uninstall device > Uninstall.

- Click on Action from the menu bar and choose Scan for hardware changes.